A Couple of Clicks: Build Wedding Seating Charts for Couples & Planners

A Couple of Clicks: Build Wedding Seating Charts for Couples & Planners
The fastest reliable way to build a wedding seating chart is an interactive floor-plan tool that imports your RSVPs and exports print-ready charts on demand. Skip spreadsheets and sticky notes if you can. Your first move: pull your confirmed guest list and lock in your table count before you touch a layout. Jubiliq handles this as one connected workflow rather than three disconnected steps.
TL;DR:
- Confirm all RSVPs and meal counts at least one to two weeks before the wedding to ensure final accuracy for seating arrangements and vendor needs.
- Always verify actual table dimensions with the venue before finalizing the layout to prevent mismatched expectations and crowded seating.
- Leave buffer seats at multiple tables to accommodate last-minute changes without the need for extensive reshuffling.
- Use a single, connected platform that syncs guest data, floor plans, and exports print-ready files to avoid version control issues during the final weeks.
- Prioritize seating fixed guests first and group others by relationship, personality, and accessibility needs to create a comfortable and functional layout.
Table of Contents
- How to Make a Wedding Seating Chart Step by Step
- When Should You Finalize Your Seating Chart?
- How Many People Fit at Each Table Size?
- Seating Etiquette: Groups, Family Conflicts, and Accessibility
- Choosing How to Display Your Seating Chart
- Exporting Files Your Vendors Actually Need
- How Jubiliq Simplifies the Whole Seating Process
- What Actually Goes Wrong With Seating Charts
- Jubiliq: Build, Share, and Run Your Seating Chart in One Place
- Sources
- FAQ
How to Make a Wedding Seating Chart Step by Step
Building a wedding seating chart is mostly a data problem wearing a design costume. Get the guest information clean first, and the visual layout practically arranges itself.
- Gather your guest data. Pull confirmed RSVPs, meal selections, accessibility needs, and plus-one confirmations into one list. Anyone still “maybe” attending doesn’t belong in this file yet.
- Import the list into your seating tool. Paste or upload your guest data and map the columns, name, group, meal choice, so the software recognizes what each field means.
- Build or import your venue’s floor plan. Choose table shapes, round, rectangular, or a mix, and set seat counts per table based on what the venue actually has.
- Seat your fixed guests first. Head table, sweetheart table, parents, and grandparents get locked in before anyone else, a sequence PlanSeats recommends because it prevents the awkward scramble of rearranging VIP seats later.
- Group-assign everyone else. Sort remaining guests by relationship clusters, family, college friends, coworkers, then apply keep-apart rules for guests who shouldn’t share a table. Most seating platforms include seat-together and keep-apart automation that handles this in seconds instead of the twenty minutes it takes by hand.
- Leave buffer seats open. A handful of unassigned chairs absorbs late RSVP changes without forcing a full reshuffle.
- Test the layout visually, then export. Walk through the chart as if you were a guest looking for your seat. Confirm sightlines to the head table and distance from speakers, then generate your vendor-ready files.
Tools that follow this pattern typically let you drag guests directly onto a floor plan and export print-ready PDFs alongside meal counts your caterer can use without reformatting anything. That single export step is where a lot of couples save hours they didn’t expect to save.
Pro Tip: Build your floor plan before you assign a single guest. Fighting table shapes and guest assignments at the same time is how charts get abandoned halfway through.
When Should You Finalize Your Seating Chart?
Most planners finalize the chart one to two weeks before the wedding, once RSVPs and meal counts are locked in. Move earlier than that and you’ll spend the final week redoing work as replies trickle in. Wait much later and your caterer or venue won’t have time to prep.
Run through this checklist before you call the chart done:
- Guest list confirmed, no outstanding RSVPs beyond your cutoff
- Table count and capacity verified directly with the venue, not just assumed from a floor plan template
- Print-ready seating chart generated in final form
- Escort cards or table cards printed and proofed
- Caterer’s meal-count sheet finalized and sent
- Day-of coordinator has their own copy, digital and printed
Different people need this information at different points, and sending it too early or too late creates its own problems. Your planner or venue coordinator should see a working draft one to two weeks out so they can flag layout conflicts. Your caterer needs the meal breakdown as soon as those numbers are locked, since kitchens plan prep around exact counts. Your day-of team, coordinators, banquet captains, whoever is running the floor, needs the final version the morning of the wedding, not the week before, in case anything shifted overnight.
A short scheduling rule fixes most last-minute chaos: nothing changes after the day-of copy goes out except a genuine emergency. If a guest cancels the morning of the wedding, that’s a note to the coordinator, not a chart revision.
How Many People Fit at Each Table Size?
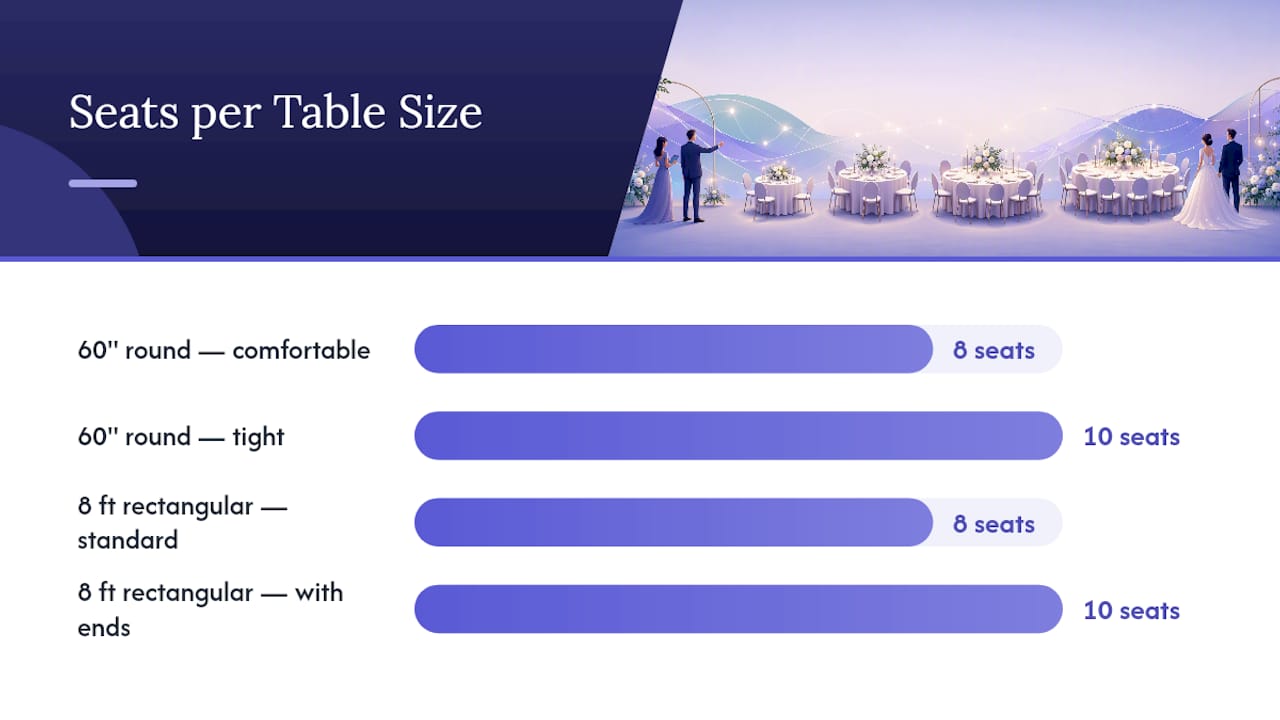
A 60-inch round table typically seats 8 comfortably and up to 10 tightly; an 8-foot rectangular table usually seats 8, or 10 if chairs are placed at the ends, according to banquet seating guidelines. Those numbers assume standard chair widths and place settings, not oversized centerpieces eating into elbow space.
Calculating table count is simple arithmetic with one important caveat. Take your confirmed guest count, divide by seats per table, then round up and add a small buffer for late additions. A wedding with 140 confirmed guests seated at 60-inch rounds (8 comfortably each) needs 18 tables, not 17.5, and probably one extra half-empty table held in reserve rather than crammed seating everywhere.
Table dimensions vary more than people expect between venues and rental companies, so verify actual measurements with your venue before finalizing anything. A “60-inch round” from one rental company can differ slightly from another, and that difference matters once you’re placing ten chairs around it.
Layout matters as much as table math. Keep at least 36 inches between chair backs for guests to move comfortably, wider near the dance floor where people will be pushing chairs back mid-song. Avoid seating anyone directly beside a speaker stack, and keep a clear sightline from every table to wherever the toasts happen. For weddings prioritizing conversation over dancing, long rectangular or banquet-style rows often beat rounds, they let more people talk across a shared table instead of splitting into separate round-table conversations that never merge.
Seating Etiquette: Groups, Family Conflicts, and Accessibility
Seat by relationship first, then refine by personality. That two-step sequence keeps the process from turning into a guessing game about who gets along with whom.
- Start with obvious clusters: immediate family, wedding party, close friends, coworkers.
- Within each cluster, group guests who’ll actually enjoy talking to each other, not just people who technically know each other.
- Seat parents and grandparents near the head table but factor in mobility and hearing needs before assuming “close to the action” is always the right call.
- For divorced parents, separate tables with equal visual prominence usually beats forcing shared seating, unless both parties have specifically requested otherwise.
- Skip the traditional “singles table.” Integrating single guests into friend groups or interest-based clusters works better than isolating them, though a loosely themed table with several outgoing personalities can work as a fallback when integration isn’t practical.
Accessibility deserves its own pass through the chart, not an afterthought. Guests using wheelchairs or mobility aids need wider spacing and a path that doesn’t require weaving through tightly packed chairs. Seat anyone with hearing difficulty away from speakers and DJ equipment, and place guests who may need to step out frequently near an aisle or exit rather than boxed into a corner table.
Pro Tip: Ask about accessibility needs directly on your RSVP form. Guessing after the fact leads to last-minute table swaps that ripple through the entire chart.
Choosing How to Display Your Seating Chart
Your seating chart needs a physical or digital format guests can actually find fast, especially if drinks are already flowing by the time they arrive. Each format trades off differently.
- Poster sign: highest visibility for large groups arriving at once, but needs real design work to stay readable.
- Mirror or acrylic display: matches a lot of reception aesthetics, though it’s pricier and harder to update if guests change last minute.
- Escort-card table: adds a personal touch and doubles as a favor moment, but slows things down when 150 guests hit the table at once.
- QR seat finder: lets guests check their table on their phone before they’re even inside, useful as a backup rather than a sole solution.
For printed posters, 24 by 36 inches is a comfortable standard size for guest counts above 100. Keep font size large enough to read from a few feet back, small enough to fit everyone, and use high contrast between text and background so it’s legible under dim reception lighting.
Larger weddings often combine a poster with individual escort cards, giving guests two ways to find their seat instead of funneling everyone toward one crowded display. A QR-based digital finder works well as the backup layer behind either option.
The tool you pick should match your priority. Design-focused platforms like Canva produce beautiful printable signage but won’t sync your RSVP list or track meal counts. If your priority is accurate, live guest data, a seat-syncing planner is the better starting point, then export to a design tool for the final printed look if you want more visual polish.
Exporting Files Your Vendors Actually Need
Different vendors need different file formats, and sending the wrong one creates confusion nobody has time for during wedding week.
- Print-ready PDF seating chart: what your printer or sign vendor uses to produce your poster or display.
- PNG floor plan: useful for your venue coordinator to reference table placement against room layout and fire code capacity.
- CSV meal counts: the format your caterer actually wants, broken down per table, not buried in a narrative guest list.
- Escort-card print sheets: formatted specifically for card stock printing, usually a separate export from the main chart.
Your venue typically wants the floor plan for their own layout and insurance documentation, while your caterer only cares about per-table meal breakdowns. A commercial printer needs a 300-dpi PDF, anything lower and your poster prints blurry at full size.
Keep one editable master copy that a single person controls, ideally you, your planner, or your day-of coordinator, and treat every other version as a downstream export. Bring a printed backup chart on the wedding day regardless of how confident you are in the digital version. Phones die, WiFi drops, and a paper copy in someone’s bag has saved more than one reception from a chaotic first ten minutes.
How Jubiliq Simplifies the Whole Seating Process
The seating workflow starts with the same guest data typically collected for RSVPs, so nothing gets entered twice. Import your guest CSV, and the platform’s interface builds a floor plan around preset table shapes and sizes matched to the venue. From there, assign guests to tables while tagging dietary restrictions and accessibility needs directly on each entry.
Everything updates in real time, so planners, caterers, and day-of coordinators can all look at the same live chart instead of outdated versions passed around by email. When ready, export meal counts and a print-ready chart in a couple of clicks. The real win is having one source of truth that eliminates version-control issues that can arise during the final two weeks.
What Actually Goes Wrong With Seating Charts
The same three mistakes show up over and over: ignoring actual table dimensions instead of verifying them with the venue, overfilling tables past comfortable capacity to avoid buying one more table, and finalizing before RSVPs settle.
The fixes are just as simple. Leave a few buffer seats open at multiple tables rather than one. Wait until meal counts are confirmed before locking the chart, not before. And assign one person, not a committee, to handle last-minute swaps on the wedding day so decisions don’t stall waiting on a group text.
Before you send anything to print, run through your vendor file list one more time and confirm your caterer and venue both have the current PDF, not last week’s version.
— HCRF
Jubiliq: Build, Share, and Run Your Seating Chart in One Place
If you’re juggling multiple tools like a spreadsheet, a design app, and group texts with your planner, a connected workflow that syncs RSVPs, includes floor-plan templates with table-size presets, print-ready chart exports, and real-time updates can replace all three.
It fits couples who want their guest list, seating, and vendor files living in one place instead of scattered across apps, and planners managing multiple weddings who need every vendor working from the same current chart. Weddings without paid ticketing often run through planning tools at no cost, so there’s no reason to keep managing seating separately from the rest of event details. Head to the Jubiliq event planning platform to start building your floor plan and import your guest list today.
Sources
- How many people can different size banquet tables seat comfortably?
- Free Wedding Seating Chart Maker | Drag & Drop Tool | Wedding Studio
- Wedding Seating Chart Maker: Plan Your Reception | PlanSeats
FAQ
How Should a Wedding Seating Chart Be Organized?
Seat fixed guests first, head table, parents, grandparents, then group everyone else by relationship, family, friends, coworkers, before refining by personality within each cluster, an order planner tools recommend to keep conversation groups intact.
What Is the Etiquette for Seating at a Wedding?
The head table or sweetheart table sits closest to the action, parents and grandparents get prominent but comfortable placement, divorced parents typically get separate tables of equal visual standing, and the outdated “singles table” is best replaced by integrating single guests into groups they’ll actually enjoy.
What Is the Traditional Ceremony Seating Plan?
Traditionally, the couple’s families and closest relatives sit in the front rows nearest the aisle, with the bride’s side on the left and the groom’s side on the right, though many modern couples now skip that split entirely in favor of open seating or a “choose a seat, not a side” approach.
When Should I Finalize My Seating Chart?
Finalize the chart one to two weeks before the wedding, once RSVPs and meal selections are confirmed, a timeline most planners follow to balance accuracy against printing and vendor deadlines.
Do I Need a Seating Chart for a Small Wedding?
Assigned seating becomes especially useful once you pass around 40 seated guests, since open seating below that threshold rarely causes the bottlenecks that larger guest counts create at arrival.